Configuration
How to embed WorkBright in a mobile application
For customers with native phone apps, WorkBright provides a mechanism for your end users to seamlessly and securely complete forms without ever leaving your app or having to set up another username or password.
View the demo below:
How this works
First, your backend creates a new employee in WorkBright through the Create Employee endpoint (or, through the conventional user interface). Unlike traditional setups, in this case we won't send a welcome email with a sign-in link.
Instead, for the user to access their forms, you make an authentication request with WorkBright, and we provide you a one-time use access token through the Request One-time Access Token endpoint. Inside your mobile app, you point an embedded webview component to a special sign-in URL, passing along that access token. WorkBright will authenticate the user and display their forms through the Signing In with a One-time Access Token endpoint. The user then completes their forms within that embedded webview, all within your app.
Once all forms are completed, WorkBright will redirect the user to a pre-configured URI scheme, which can be handled natively by your app (e.g. yourapp://forms_complete) to take them to the next screen. You are in full control of the user experience – we just provide the forms in an embedded browser.

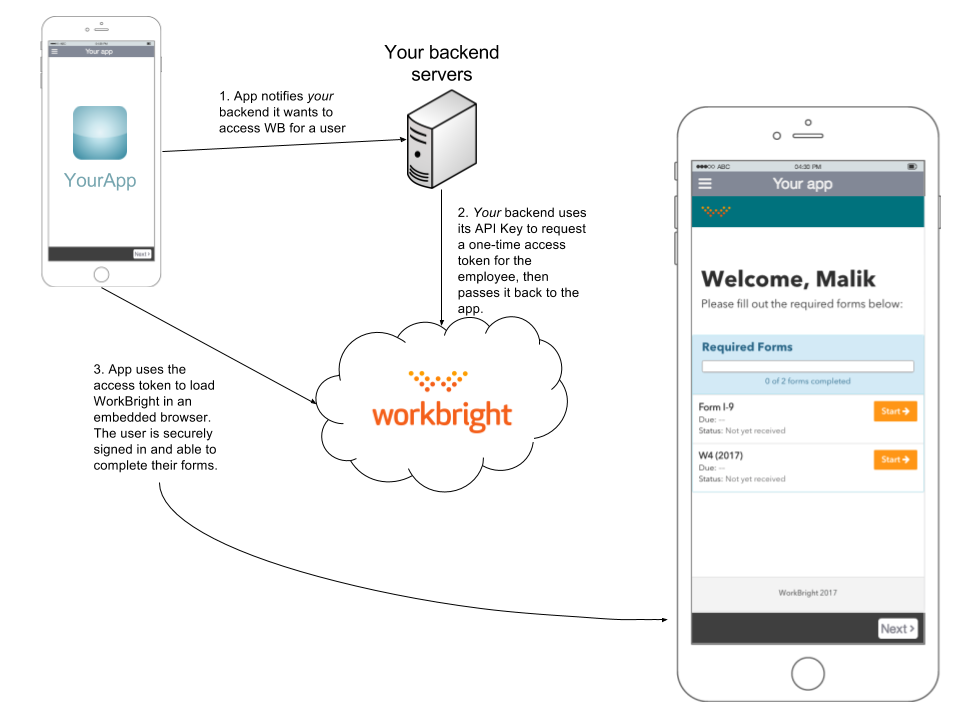
Workflow for Embeddable WorkBright
IMPORTANT SECURITY WARNINGThe mobile app must not communicate directly with the WorkBright API. Do not hardcode or bundle your private WorkBright API key in your mobile app in any way, or it may be exposed to network traffic sniffers or by simply decompiling your app.
You must safeguard your API key by only using it from your backend servers.
Implementation Details
Implementation can be broken down into the three steps shown in the workflow diagram above:
-
The mobile app makes a request to your backend in order to kick off the process. Since this communication does not involve WorkBright, it is entirely up to you how to implement it. For example, this could happen as part of the initial login procedure into your app, or as a request later in some other part of the app.
-
Once your backend receives the request from the app, it in turn needs to make a request for a One-time Access Token via the WorkBright API. The API will respond with a unique token for that employee. Your backend should then pass that token back to your app.
-
Now that the mobile app has an access token, it can initialize a new embedded webview instance and navigate to the token-based sign in URL. WorkBright will sign in the user and redirect the browser to the dashboard showing a list of forms to complete. The access token will be invalidated once the user is signed in, so it can be discarded at this point.
Webview Development References
Employee ID
In order to sign in as the correct WorkBright user, your backend will need to associate each of your users with their corresponding WorkBright employee ID. For storing WorkBright IDs in your database, you should choose a data type that roughly corresponds to ours: a 4-byte integer with a range of values from 1 to 2147483647 (these IDs are unique to your subdomain).
Session Expiration
Once authentication is successful, the embedded webview will remain signed into WorkBright with a cookie. A new token will not be needed for the remainder of the session. However, as with a traditional sign in, the session will expire after 1 hour of inactivity.
Depending on your application, it is possible that users may leave your application and return to fill out forms some time later.
We recommend requesting a new token and reloading the webview if:
- a new webview instance is displayed;
- the application is resumed from a paused or background state;
- the webview receives a 401 Unauthorized status. (Depending on what is available in your SDK, checking for an empty webview body after reload is acceptable.)
Forms Complete Redirect
When the user completes all of their forms, WorkBright can redirect the embedded browser to a pre-configured URI scheme which can then be handled by native code in your mobile app.
Configuring the Forms Redirect
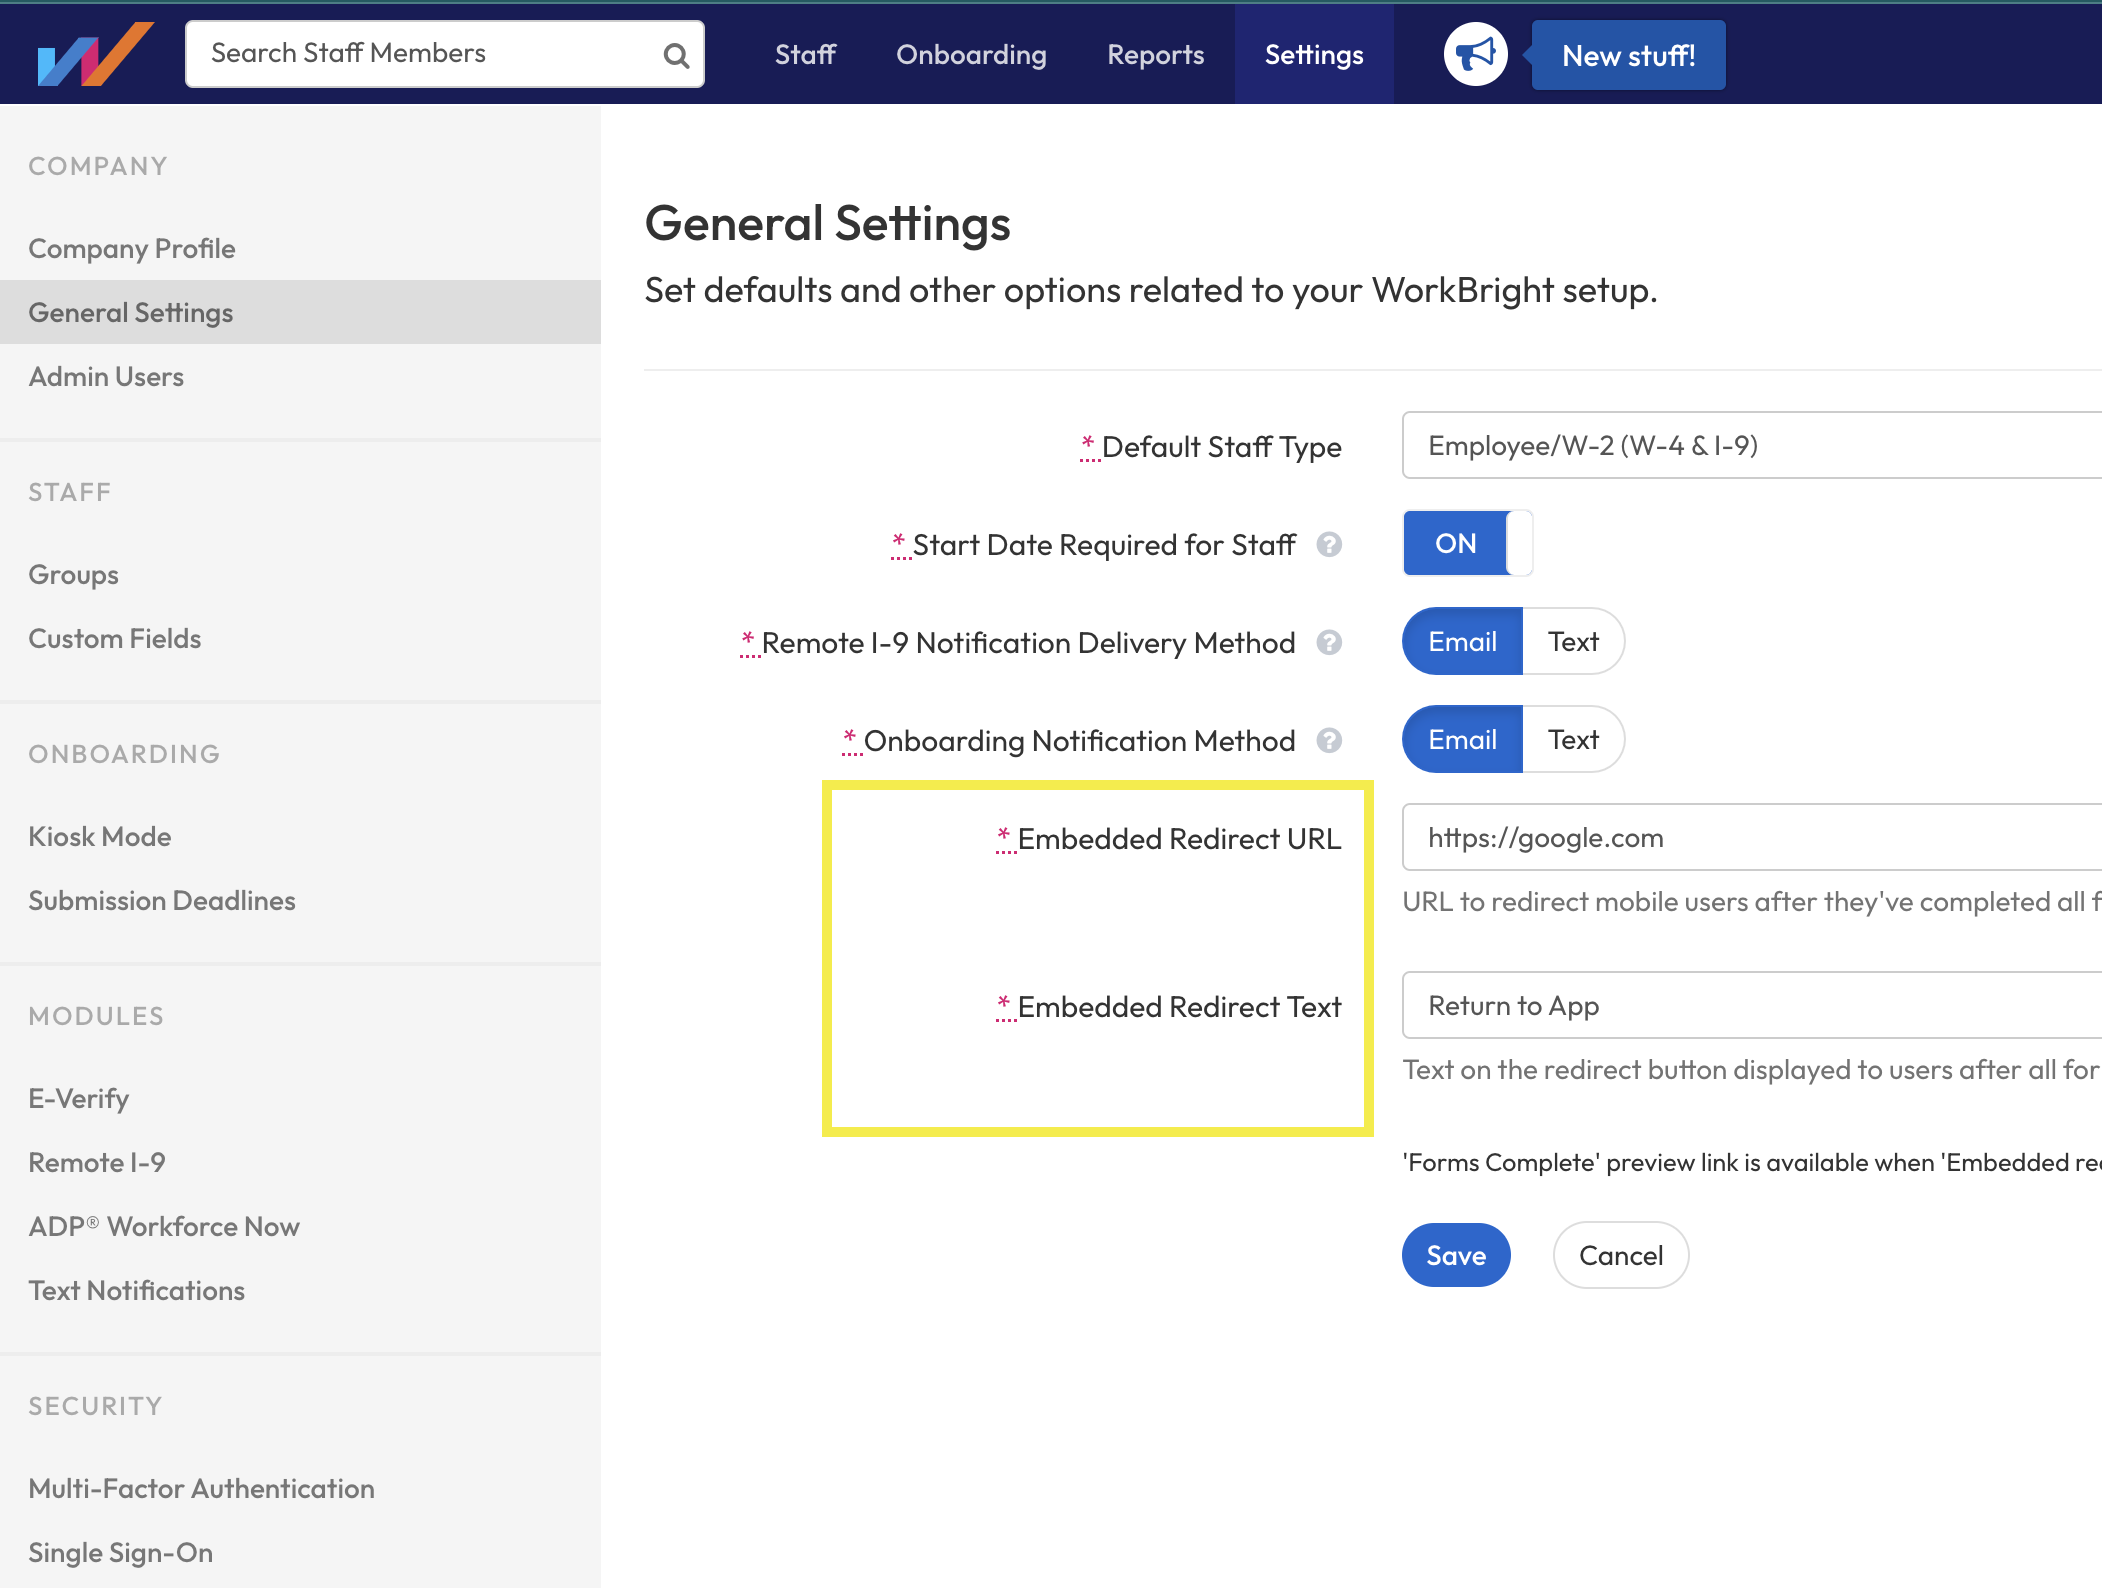
Choose where you want the employee to be redirected to after completing all WorkBright forms. Set it up by signing in to the WorkBright admin interface, and navigating to Settings -> General Settings. You should see the following additional options:

Options related to Embedded WorkBright are highlighted in yellow
You may put any URL you wish, the most common option is to create a new URL scheme representing your application (e.g. myapp://). For your reference, here are links to the iOS and Android documentation on how to implement handlers for custom URL schemes:
iOS: Using URL Schemes to Communicate with Apps
Android: Allowing Other Apps to Start Your Activity
Once you fill out the Embedded redirect URL and hit Save, you will be given a preview option:
Finally, in addition to the above configuration, you can subscribe to the employee.all_forms_received webhook event. This enables you to perform any additional processing on your backend servers that can't be set up in settings alone. See the webhook documentation for All Employee Forms Received for more information.
Other Considerations
Embedded or Traditional, not both
When choosing to embed WorkBright in your mobile app, you implicitly eliminate the option for users to sign in through the traditional workbright.com interface. In other words, the only way users will be able to access their WorkBright forms is through your mobile app. This is necessary because in the Embedded workflow, users are never given the option to set up a WorkBright password so they have no way to sign in to the WorkBright.com interface. While in many ways this is a benefit to your users who only have to only maintain one password, it is an inherent limitation of this feature.
Keeping profile information in sync
Even though your users are accessing WorkBright forms through your mobile app, they still have a separate WorkBright profile in our system. This profile includes things like email address, birthdate, phone number, and so on. Forms like I-9 and W-4 will even pre-fill this profile data so users don't have to constantly re-type their address.
Showing users a separate WorkBright profile may be confusing to them, so we recommend that your backend keeps WorkBright in sync by calling Update Employee whenever basic profile information changes on your end. For a detailed list of profile information, refer to the Employee object table. Best practice is to keep at least the following fields always in sync:
- First Name
- Last Name
- Birthdate
- Address (street, city, state, zip, country)
- Phone number
- Gender
- SSN
If Embedded WorkBright is enabled, all of these fields are required when creating a new employee through the API.
Direct URLs
If you would like to send your staff to a specific form/document within your WebView, you can do so with the following format:
https://{yoursubdomain}.workrbright.com/forms/{DocumentID}/submission/new
/forms/i9/submission/new
/forms/w4/submission/new
/forms/12/submission/new
If you would like to send your administrator to a specific E-Verify Case, you can redirect to the following path, /everify/cases?id={id}#detail
/everify/cases?id=100#detailThe id field can be found using the List E-Verify Cases endpoint and using the id (WorkBright's internal case) NOT case_id (Everify's case) from the response. You can filter by using the search parameter or parsing the data response on your own.
Updated 8 months ago
